Get started with Birkly in six steps: (0) Install via release zip or Docker, then open 0_START-HERE.html before admin login. (1) Log in to the admin. (2) Complete the first-time wizard (project name, use case, optional AI). (3) Create a collection (e.g. “Blog posts”) and add fields (title, content, date, image). (4) Add one or more entries and set status to Published. (5) Add the Birkly client script to your website so it can load and display the content. No coding is required for basic content creation; connecting the site is one script tag plus simple placeholders in your HTML.
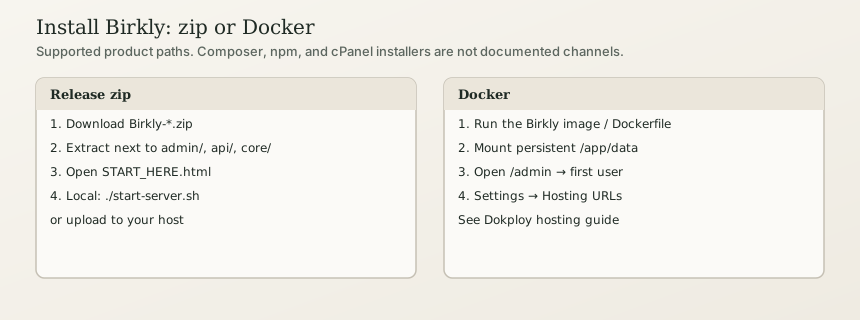
Supported install channels are zip and Docker only — Composer, npm, and cPanel installers are not documented product paths. See Deployment and Hosting on Dokploy.
Beginner
Step 0 — Extract and open 0_START-HERE.html
If you downloaded Birkly as a zip file, do this before logging in to the admin:
- Extract the zip to a folder (e.g.
Documents/Birklyon your computer, or upload the contents to your web host). - Confirm you see
0_START-HERE.htmlin the same folder asadmin/,api/, andcore/— not still inside the zip, and not one folder too deep (e.g.Birkly/Birkly/). - Open
0_START-HERE.htmlin your browser (double-click the file locally, or visithttps://your-domain.com/0_START-HERE.htmlafter upload). - Wait for the folder check to confirm you're in the right place.
- Choose On your computer (local test with PHP) or On a web server (FTP/cloud), follow the short steps for your path, then click Start setup to open the admin onboarding wizard.
Example: You extract Birkly-1.0.zip to ~/Birkly, open 0_START-HERE.html, pick On your computer, run ./start-server.sh in that folder, then click Start setup — the browser opens the admin wizard at http://localhost:8080/admin/ with local install hints.
Windows: A terminal is the text window named PowerShell, already on your PC. In File Explorer, Windows 11: right-click the Birkly folder → Open in Terminal. Windows 10: Shift+right-click → Open PowerShell window here (or type powershell in the address bar). Copy the command from 0_START-HERE.html, paste with Ctrl+V, and press Enter.
powershell -ExecutionPolicy Bypass -File .\check-php.ps1- If PHP is missing:
powershell -ExecutionPolicy Bypass -File .\install-php.ps1 powershell -ExecutionPolicy Bypass -File .\start-server.ps1
Leave that window open. It prints the admin login, usually http://localhost:8080/admin/. Bookmark it. The next day, run the same start command again, then open that address. If the built-in server stays slow, use Laragon, XAMPP, or MAMP and point the document root at the Birkly folder. Mac and Linux use ./check-php.sh and ./start-server.sh the same way.
For server installs and Hub plugins, see Self-host install.
---
Step 1 — Log in
Open your Birkly address in the browser. It usually looks like:
https://your-domain.com/admin
or
http://localhost:8080/admin(if you’re running Birkly locally).
Enter your email and password. If no admin account exists yet, the onboarding wizard asks you to create one first. Otherwise, an administrator must create one for you or send you an invite (you’ll receive a link to set your password).
Example: If your CMS is at https://cms.mycompany.com, you go to https://cms.mycompany.com/admin and sign in. After login you’ll see the Dashboard (overview) and the sidebar with Content, Media, Settings, etc.
---
Step 2 — Complete the setup wizard (first time only)
The first time you (or anyone) use the installation, you may see the onboarding wizard (especially if you arrived via START_HERE). It will ask for:
- Project name — For the admin panel only (sidebar label, browser tab). It does not set your website’s public title or URL.
- Use case (optional) — Blog, business site, shop, docs, or developer project; may include demo content you can keep or remove.
- Hub (optional) — A pointer to install official plugins (Commerce, Events, etc.) from Plugins → Hub.
- Connect AI (optional) — A short BYOAI flow; you can always skip and return later under Settings → AI.
You can skip any step. After that, the Dashboard and sidebar are your starting point. A short setup checklist on the Dashboard shows essential next steps (collection, entry, marketplace plugin; Connect AI only if you skipped it in the wizard).
Example: You might enter “Acme Blog” as the project name, pick the blog use case, skip AI for now, and land on the Dashboard with a checklist prompting you to create your first collection.
---
Step 3 — Create a collection
Collections are the types of content you manage (e.g. “Blog posts,” “Products,” “Team members”). You create each type once and then add as many entries as you need.
- In the sidebar, click Content.
- Click Create collection (or New collection).
- Give it a name that editors will see (e.g. “Blog posts,” “Services”).
- Add fields—the pieces of information each entry will have. For each field you choose a label (what appears in the form) and a type (what kind of data).
Example — A “Blog posts” collection:
| Field label | Type | Purpose |
|---|---|---|
| Title | Text | Post title |
| Content | Editor | Main body (rich text) |
| Excerpt | Textarea | Short summary |
| Publication date | Date | When the post was published |
| Featured image | Media | One image for the post |
| Tags | Tags | Optional tags |
- In the collection’s Settings (or Configuration) tab, leave Entry method as “Admin only” unless you want to accept submissions from your website (e.g. a contact form).
- Save the collection.
After saving, you’ll see the new collection in the Content list. Click it to open it and add entries.
---
Step 4 — Add entries
An entry is one item in a collection (one blog post, one product, one team member).
- Open the collection (e.g. “Blog posts”) from the Content area.
- Click New entry (or Add entry).
- Fill in each field:
- Title — Type the post title. - Content — Use the editor to write the body (bold, lists, links, images as needed). - Publication date — Pick the date (and time if the field allows). - Featured image — Click to open the Media Library, pick or upload an image. - Any other fields you added (e.g. Excerpt, Tags).
- Slug — This becomes the URL-friendly part (e.g.
my-first-post). It’s often filled in automatically from the title; you can change it if you want a different URL. - Status — Choose Draft (saved but not visible on the site) or Published (visible). Use Save or Save & Publish.
- Click Save.
Example: You create an entry with title “Welcome to our blog,” content “This is our first post…,” date “2025-02-05,” and slug welcome-to-our-blog. You set status to Published and save. That entry is now stored and will appear when your website loads blog posts from Birkly (once the site is connected).
Repeat for more entries. You can edit or delete entries anytime from the collection’s entry list.
---
Step 5 — Connect your website
So far the content lives only in the admin. To show it on your actual website:
- Add the Birkly client script to your HTML. One script tag is enough; it should point to your Birkly address.
- In your HTML, use placeholders where you want content (e.g. “show the title here,” “list all blog posts”). The client script loads the content from Birkly and fills those placeholders when someone visits the page.
Example (minimal):
In your page’s HTML you might have something like:
- A placeholder for a single post’s title and body (e.g. on a “post” page that shows one article).
- A placeholder that means “list the latest 5 blog posts” (e.g. on your homepage).
Your developer or host can add the exact script tag and placeholder syntax (Birkly uses a simple templating language). Once that’s in place, when you publish or edit an entry in the admin, the live site will show the updated content (either immediately when the page loads or after a refresh, depending on how the site is built).
From here you can add more collections (e.g. “Products,” “Team”), upload more media, invite other users, or explore Settings and Help in the admin.
Advanced Users
0. First-run and release layout
- Release zip includes
START_HERE.htmlandSTART_HERE.txtat the root. Extract before use; probe viaGET /api/setup_probe.php. - START_HERE Start setup links to
/admin/?page=onboarding&install=local|cloud;install_pathpersists insettings/onboarding.json.
1. Auth and onboarding
- Log in at
/admin. First run may show onboarding v2 (install context, site info, use case, marketplace hint, optional BYOAI mini-wizard). Onboarding state is stored so it doesn’t show again; partial progress resumes vialast_step. - Users and roles are managed under Settings (or Users/Roles). Invites and password reset depend on configuration (email, etc.).
2. Content model
- Collection: name, handle (e.g.
blog), fields (name/key, type, required, options). Handle is used in API and templates and should be stable. - Entry: one JSON file per entry (or DB row if using DB for entries); fields +
slug,status(draft/published). Only published entries are returned by the public API by default. - Example API:
GET /api/public/collections/blog/entriesreturns published entries;GET /api/public/collections/blog/entries/welcome-to-our-blogreturns the entry with that slug.
3. Frontend integration
- Option A — Client script:
<script src="https://your-cms.example.com/birkly-client.js" data-cms-url="https://your-cms.example.com"></script> Use templating in the same HTML (e.g. { title }, {for each entry in 'blog'}). Client fetches from Public API and renders.
- Option B — Direct API:
Fetch GET /api/public/collections/{handle}/entries (and single-entry by slug) from your app; render with your own stack (SSR, SPA, static build).
4. Optional next steps
- Entry method: In collection Settings, set to “Public API” if you need form submissions or external systems to create entries.
- Media: Upload in Media; reference in entries via Media or Gallery fields.
- Roles: Create roles and assign permissions (view, edit, manage settings, etc.).
- Automation: Configure workflows (scheduled or webhook-triggered) for notifications or integrations.
See Collections, Entries, Website integration, Client library.